Showing posts with label Recipes. Show all posts

Tuesday, March 18, 2014

Raspberry Danish Sweet Rolls


DSC_0023

I *LOVE* sweet rolls.

I mean I really, really like them. I like cinnamon rolls and orange rolls and especially gooey, soft, melt in your mouth caramel rolls. And in my years I’ve made quite a few from scratch.

This week I signed up to bring a treat to our bi-weekly MOPS meeting. And I had in my mind that I wanted to bring sweet rolls. I’m blaming my cravings on the baby but really this is something I would crave basically at any point in my life. So I hit up Pinterest to see if I could find something inspiring and I happened upon Raspberry Sticky Buns on A Spicy Perspective.

Um, these are pretty amazing. Warm and cold they taste like a raspberry danish. That in my mind is a definite win. And for anyone afraid of yeast, it’s your lucky day. Because these amazing rolls take advantage of one of my favorite freezer products, Rhodes Bread Dough. Seriously, I use that stuff for so many things, like pepperoni rolls and ham and cheese stromboli.

The recipe can be found here:

Raspberry Sticky Buns

*For the glaze I made my own throwing together heavy cream, powdered sugar, & lemon juice/zest. *

Wednesday, February 5, 2014

Pasta Carbonara with Leeks and lemon

Oh my goodness you guys, this was SO GOOD!

photo(8)

And SO easy.

Seriously I started dinner at 5pm and it was done at 5:28. I timed it because my husband said he would be in for dinner at 5:30 but then was detained so we didn’t eat until 5:45. While it definitely tastes better RIGHT when it is done, reheated was delicious as well. What can you do.

30 minute meal that tastes delicious and is filling. Perfect in my book. This is a keeper.

The punch of lemon mixed with the creaminess of the eggs and parmesan creates a delicious coating for pasta. And then add bacon and leeks to the party…your mouth will do a happy dance guaranteed. Leeks are one of my favorite vegetables for winter. Along with this pasta we love them in this Potato Leek soup and this Bacon and Leek Quiche.

If you have an aversion to using raw eggs, even though they are tempered a bit with the hot pasta water, I don’t have any alternatives for you. Sorry! I try to find pasteurized eggs if I can and if I can’t then I just roll with it. So far we haven’t had any reactions. And had Elizabeth been feeling better I’m almost certain she would have loved this as well. That soup above is one of her favorites!

Here’s the link to the recipe…I followed it exactly with the exception of draining the bacon grease. I just left it all in there! Yum!

Pasta Carbonara with Leeks and Lemon from Martha Stewart Everyday Food

Monday, January 13, 2014

Fighting winter colds: Chicken soup

It’s that time of year. Colds, sickness, sneezing…the whole bit seems to turn our worlds upside down with yucky crud. We’ve tasted our bit of winter flu over Christmas where our whole family battled through a 24 hour bug. But that’s a first for us. Thankfully we stay pretty healthy throughout the winters, maybe due to strong immune systems? I’m actually not very adamant or good about fighting germs…maybe that’s how our immune systems grew strong? Maybe this will come back to bite us, but for now we’re going with what works for us.

DSC_0182 (2)


But when the sick does come, we’ll be ready with this amazing chicken noodle soup. While we were in the middle of remodeling our kitchen I tried to embrace our crock pot more and in doing so this amazing soup was born. It’s traditional chicken noodle, but with inexpensive and good for you, organic ingredients, and the flavor is spot on. Because I use bone in chicken you get so much more flavor than using chicken without the bones. Plus there is added nutrition in the bones that you can take advantage of as well.

After years of trying to perfect my chicken noodle and being frustrated with the broth and attention to detail this recipe produces perfect results with little attention to detail. I’m so over bland boneless skinless chicken breasts and so this recipe uses my favorite new ingredient, organic free range chicken legs from Trader Joes. I can usually find a pound+ package for $3 or under which to me is the deal of the century. It’s true that using better ingredients will produce a better product and that’s what happens here.

Try this for combating your next cold…or just any day that chicken soup sounds delicious!


Slow Cooker Chicken Soup

1 - pkg of Trader Joe’s Organic chicken legs (or 1 lb. of other chicken)

1 - carton of Trader Joe’s Organic chicken broth or 4-5 C of chicken stock

1 - yellow onion diced

1 to 2C total – diced carrots and celery

1/4 teas. – thyme

salt and pepper

cooked pasta of choice (tiny stars or egg noodles are perfect)


1. Place chicken and diced onion in slow cooker. sprinkle liberally with salt and pepper. Cover with broth. turn on low and cook for 2 – 2 1/2 hours

2. after 2 hours or so add in the diced carrots and celery and add the thyme. Cook for an additional hour.

3. After an hour or so remove the chicken…remove chicken from the bones, discarding bones and skin. place chicken back in crock pot.

4. at this point chicken soup is ready to eat. Add pasta to bowls and ladle soup over. (we like to store pasta separate from the soup so it doesn’t overcook but you can add the pasta straight to the soup at this point)…alternatively if you decide to add pasta to cook in the slow cooker you will need to add more broth.

enjoy!

Thursday, September 19, 2013

Pumpkin Swirl Bread

DSC_0022

This weekend the air finally changed. You know when that time of year comes and even if it’s above 70 degrees it just feels different? That happened over the weekend. Our lows at night have gotten lower and there’s a crispness to the air.

To celebrate I made bread. Something that hasn’t happened in 14 months. And if I do say so myself, this bread is amazing. One of my favorite treats in the fall is the pumpkin swirl bread from Great Harvest. And this, well this is almost the same. It’s a tiny bit spicy, soft, heavenly toasted with butter,and tastes like fall.

And I happened upon the end result by mistake. Somehow in the rush at the grocery store I ended up grabbing pumpkin pie filling INSTEAD of canned pumpkin and I didn’t realize my mistake until both loaves were in the oven. Oops.

Well luckily for me the end result was better for it and from now on my newly altered recipe will be my go-to.

DSC_0040

Pumpkin Swirl Bread

(adapted from this Pumpkin Yeast Bread recipe)

1/2 cup warm water
2 tablespoons instant yeast
2/3 cup warm milk
2 large eggs, beaten
1 1/2 cups Pumpkin Pie filling
2 tablespoons vegetable oil
6 1/2 cups (approximately) All-Purpose Flour
1/2 cup brown sugar
2 teaspoons salt
1 teaspoon pumpkin pie spice

Filling (mix all together in small bowl):

1/2 cup granulated sugar                                                                                      1/2 cup pumpkin pie filling                                                                                      2 teaspoons ground cinnamon


In a large bowl, stir yeast into water to soften. Add milk, eggs, pumpkin, oil, 4 cups flour, brown sugar, salt, ginger and cardamom to yeast mixture. Beat vigorously for a few minutes.


Gradually add remaining flour until you have a dough stiff enough to knead. Turn dough out onto a floured surface. Knead, adding flour as necessary, until you have a smooth, elastic dough.  (I used my stand mixer to mix up the dough)


Put dough into an oiled bowl. Turn once to coat entire ball of dough with oil. Cover with a towel and let rise until doubled, about 1 hour. Turn dough out onto a lightly oiled work surface. Divide dough in half. Press dough into rectangles and spread filling over rectangle. Roll up, pulling dough up to cover the ends and pressing lightly along the seam to close. Let rise again, covered gently with a dish towel for 30-40 minutes. Place on a silpat or parchment paper atop a jelly roll pan.

Bake in a preheated 375°F oven. Loaves bake about 30 minutes, rolls about 20. Check the internal temperature of each with an instant-read thermometer.

Immediately remove bread from pans and cool on a wire rack to prevent crust from becoming soggy. For a shiny crust, brush tops of bread or rolls lightly with vegetable oil. Makes 2 large loaves, or 1 large loaf and 12 dinner rolls.

Thursday, August 22, 2013

favorite summer salads

With Labor day coming up next week and still a few weeks of summer left, I figured that it wasn’t too late to post my favorite summer salads. If you are new to reading my blog you may not know that I hold Ina Garten to be my culinary favorite.

She’s basically taught me how to cook and inspired me to want to eat just about anything. Way back 7+ years ago I went to France on a summer missions trip through Campus Crusade and I fell in love with open markets and the beauty of fresh food. When I came back I began cooking more for the family I nannied for and food from Ina Garten’s cookbooks was what I prepared. It’s everyday, classic, comfort food that gets taken up a notch.

From Ina I’ve learned to use the best ingredients I can afford and find, that good food doesn’t have to be super fancy or made from things I’ve never heard of, and that simple can be elegant. If you get a meal from us or you come and eat at our house I can assure you that something on our table will be inspired by Ina. She’s never let me down yet and I’m certain she may never.

So back to my three favorite salads for summer…I should note they are all free of greens. I’m not sure what it’s been this summer but salads with greens just haven’t been what I’m craving. Instead I’m loving vegetables mixed with pasta, bread or atop gooey cheesy tortillas. I love that most of these just require pantry staples and fresh vegetables which makes summer cooking even easier. So here they are, all recipes from Ina Garten with a couple changes here or there.

1. Greek Panzanella

DSC_0047

While I love Ina’s traditional Panzanella, I love her Greek version even more. I love the crispy bread croutons, the bite of feta, and freshness from all the vegetables. I’d eat this everyday.

2. Guacamole Salad

We make this one often because we always have these ingredients on hand. I guess you could say we like Mexican-inspired dishes. The main change I make to this one is that I add cilantro (Ina has an aversion) and we usually have it atop cheese quesadillas to make it a bit heartier.

3. Roasted Vegetable Orzo

IMG_1422

This is seriously my favorite. I’d eat it everyday. Literally. The creaminess of the orzo mixed with the bright lemon and feta, so amazing. It gets better after it sits and it’s perfect warm, room temperature, or cold right out of the fridge. Oh and I always use less oil than mentioned. Just eyeball it:)

Do you have a favorite summer salad?

Friday, July 19, 2013

Foodie Friday: White Pizzas

<a href="http://www.bloglovin.com/blog/5939049/?claim=gjxmecnsfkw">Follow my blog with Bloglovin</a>
Our dinner on Wednesday night garnered a “10” by Alex. Just so you know I can count on two hands the number of times a meal has been given that status in our almost 7 year marriage. Lots of “9’s” but a “10” is almost unheard of. I would have to agree with him that dinner the other night was pretty much amazing.
IMG_1244
And just to let you know, this meal came together in almost 30 minutes and was incredibly easy. I know I like to cook and some meals may seem easy to me but mind boggling to others, but this one truly is easy. And it’s great to make it when it’s super steamy out like the 100 degree days we’ve been having as the dough will rise super fast outside:)
For our white pizzas I followed Ina Garten’s (my food idol) recipe almost to a T. First off halved it. That’s easy, just reduce all ingredients in half. Then I only used mozzarella cheese, I added pepperoni under the cheese, eliminated the thyme and added grape tomatoes to the salad on top. These were just minor changes that suited our tastes better but I can tell you that nothing beats cold salad atop steaming pizza.
It’s sublime.
Here’s a link to Ina’s recipe…White Pizzas with Arugula…make this now.

Friday, June 28, 2013

Foodie Friday-CSA

It’s CSA season!

We’re really excited to be back in a CSA (community supported agriculture) this year as we tend to consume more vegetables when we are. Eventually we hope to have a garden in our backyard but it will be a year or two before that happens. We just had a landscape plan put together (because we both have NO vision for that stuff) and will be implementing it little by little as time and money allow. So building container gardens would not be a good decision until the other pieces are in place. But enough of that talk.

CSA…this year we joined Fazenda Boa Terra on the great reviews of friends AND because they drop at our local farmer’s market just a couple of miles from our house. Best part about this is that we do not have to lug a box back and forth. Picking up at the market is so convenient as we just pick our organic produce and pop it in our bag. Easy peasy.

This week our bag was filled with:

Rainbow chard  /  kale  /  arugula  /  mixed greens  /  salad greens  /  broccoli rabe  /  leaf lettuce  /  Radishes  /  Parsley  /  Bok Choy

How did we use all these greens?

Like this:

Kale – morning smoothies  (Kale, berries, yogurt, splash of OJ, flax, banana)

Chard – Swiss Chard, Onion, and Cheese Frittata

Broccoli Rabe – Orechiette w/ Broccoli Rabe & Sausage via Ina Garten’s Foolproof

Arugula: White Pizzas via Ina Garten

Bok Choy: Braised Soy-ginger Chicken w/ Bok Choy

Salad green were used for salads and radishes for eating:)

I love how getting produce in our CSA forces us to go outside our comfort box, enjoy amazing, good for you, vegetables, and it definitely makes me get creative in the kitchen. All of the above were loved by all three of us, especially Elizabeth!

Friday, April 26, 2013

Foodie Friday: Homemade Pretzels

If you know my husband you know he has three favorite snack foods: baby carrots, pretzels, and candy. If we are ever out of the those three things, life at our house gets a little more stressful. One weekend our pretzel bag was empty and our soft pretzel stash was gone and I was not going to go to the store one.more.time. Seriously, anyone else feel that way? Inevitably every time I go, somehow I forget one important thing!

So one Saturday I pulled out my trusty recipe for soft pretzels and made a batch. They are so good. I even froze some so that we can enjoy them as the weeks go on in case, somehow, I forget to restock the snack drawer.

IMG_0869

I’ve been making pretzels since we first got married, over 6 years ago, and pretzel dough is by far the easiest yeast dough I’ve worked with. These are near impossible to screw up and always taste great.

The recipe for these pretzels can be found here:

Homemade Pretzels

Some other options I’ve made in the past include these:

Ham and Cheese Filled Pretzel Bites & regular Pretzel Bites

Pretzel Rolls

Friday, March 29, 2013

Foodie Friday - Cheddar Dill Scones

To say we love these would be an understatement. A few years ago the family I worked for asked me to whip these up to accompany some soup they were having for dinner. It was my first time making them and I haven’t stopped since. These are so good.

IMG_0778

They’ve become my go-to recipe when asked to bring bread to an event, like our bible study luncheon and they often accompany soup or chili at our house. Often I’ll adapt them depending on what we have in our fridge and to accommodate my husband’s taste they often become cheese scones as he’s not as fond of the dill. If making them into cheese scones I like to either use pepper jack or an aged cheddar to allow the cheese to shine.

IMG_0780

Other adaptations I almost always make because I don’t usually have extra large eggs and heavy cream on hand: large eggs and milk (recipe illustrates that).

Ina Garten’s Cheddar Dill Scones

adapted from here

Ingredients
2 cups plus 1 tablespoon all-purpose flour, divided 
1 tablespoons baking powder
1 teaspoons salt 
1/4  pound cold unsalted butter + 2T, diced
2 large eggs, beaten lightly
1/2 cup cold heavy cream (or milk)
1/4 pound extra-sharp yellow Cheddar, small-diced (or cheese of choice)           1/2 cup minced fresh dill
1 egg beaten with 1 tablespoon water or milk, for egg wash (optional)

Directions
-Preheat the oven to 400 degrees F.
-Combine 4 cups of flour, the baking powder, and salt in the bowl of an electric mixer fitted with a paddle attachment. Add the butter and mix on low speed until the butter is in pea-sized pieces. Mix the eggs and heavy cream and quickly add them to the flour-and-butter mixture. Combine until just blended. Toss together the Cheddar, dill, and 1 tablespoon of flour and add them to the dough. Mix until they are almost incorporated.                        

-Dump the dough onto a well-floured surface and knead it for 1 minute, until the Cheddar and dill are well distributed. Roll the dough 3/4-inch thick. Cut into 4-inch squares and then in half diagonally to make triangles. Brush the tops with egg wash. Bake on a baking sheet lined with parchment paper for 20 to 25 minutes, until the outside is crusty and the inside is fully baked.

Monday, March 25, 2013

On Feeding the Babe…part 2

We’re in a whole new world over here.

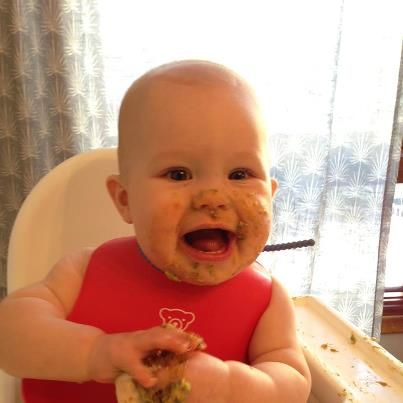
Our daughter can really house some food. Seriously. It cracks us up nearly every dinnertime, especially if it’s something she likes. Like guacamole. On family taco night she ate so much taco meat covered in guacamole that Alex and I were in shock.

We’ve transitioned almost entirely to Baby Led Weaning (BLW) and have, for the most part, put away our spoons and purees. This has been SO liberating. We were never really doing purees entirely, but now that she can shovel it in, we’ve put them on the back shelf, at least we thought we did.

Our first round of feeding baby can be found here: Elizabeth & Food.

That was until we went on vacation. In preparing for our second trip to Florida, I picked up a few food pouches thinking they would be great for the airport, etc. I decided to let her try one before we left and halfway through she pulled it out of my hand with a look on her face, “mama I got this.” And got it she did. She can not only eat out of the pouch but hold it as well. Even more liberating.

Well, on vacation, Elizabeth experienced her first cold, high temps and all. And her eating of solids went out the window. Purees and milk were all she wanted. And since we’ve been back she’s been a bit more finicky with her solids. Some things she wants, like guacamole, and others she doesn’t, like her former favorite fruit of bananas. So instead of investing in loads of pouches, I decided to put our frozen cubes of purees to use. In a Little Green Pouch.

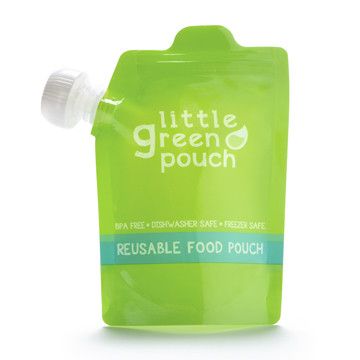
These are amazing. I just pop a few frozen cubes of food into the microwave to thaw or leave them out, mix them together, and pour them in. Obviously not as simple as just plucking them off the shelf, but at least I can semi control what is going in them and hopefully they will prove to be a money saver.

And now back to making frozen baby food cubes…

Easiest, cheapest, and most straightforward way to make your own baby food especially if you want the food to be organic?

BUY FROZEN.

Frozen fruits and veggies retain all of their nutrients, are less expensive than their fresh counterparts, and are frozen at peak ripeness. I buy bags of frozen peas, green beans, squash, carrots, spinach, kale, blueberries, strawberries, etc. Trader Joe’s has an excellent frozen organic fruits/veggies for really cheap! When I want to make a batch of cubes, I place the desired amount of food into a dish, cook it (microwave/steam/stovetop), and pop it in the blender. Then pour into containers and freeze if needed. I know there is debate over refreezing a thawed item but I’m not that concerned. More info is here which explains that most veggies and fruit are flash frozen and never cooked before freezing. We’ve never had an issue, I’ve tasted all of it and it tastes perfectly normal, great even.

Elizabeth’s favorite combo: Pears, Spinach, and Kale

So now we are using both. Purees for pouches and BLW for most meals.

Friday, March 22, 2013

Foodie Friday–Best of the week

It’s Friday again and time for another round up of great food. This week has been a little crazy trying to get bad into the swing of things post-vacation but despite that we’ve had some good meals. Having a baby that can eat almost everything we can has been a great motivator to vary our recipes. We want her to be exposed to new things while at the same time eating things we really enjoy as well! As for the things we made this week, I would make all of them again which doesn’t happen that often.

This week our menu included:

Taco Night with Mexican Rice

(homemade “box tacos” aka hard shells with spicy ground beef using this homemade taco seasoning)

Beef and Bean Burritos

(these were awesome, great way to use leftover taco meat and I’m sure they would freeze well…we didn’t use enchilada sauce or the red sauce in the meat, and instead topped with shredded romaine and tomatoes.)

Winter Minestrone & Cheddar Scones

(Soup was excellent and was great in providing finger foods for Elizabeth. Also cheddar scones are a favorite around here adapted from Ina’s Cheddar Dill Scones.)

Smothered Mediterranean Chicken with Pasta

(This was also really good. I just oven roasted some grape tomatoes in lieu of the tomatoes per the recipe. Quick, filling, and really yummy!)

Homemade Pizza

(using Trader Joe’s pizza dough Smile)


What great meals did you have this week?

Thursday, February 28, 2013

Foodie Friday–Best of the Week

Lately I’ve been much better about making sure dinner gets on the table. The days are becoming more and more predictable and my desire to get back in the kitchen has come back in full swing. The past week or two we’ve had some really good meals so I thought I would share what has made it onto our table.

In the past week or so these meals have been made and enjoyed wholeheartedly by all three of us! Elizabeth’s favorites were the Barbacoa and chicken and dumplings. She’d bang her hands on the high chair to make sure we would give her more:)

photo(1)

-Barbacoa - This was SO GOOD; I cut the recipe in half and wish I wouldn’t have

-Teriyaki Chicken – good

-Lighter Chicken and DumplingsAMAZING…this will be in our rotation

-Pepperoni Rolls – These are a staple and so, so good

-Lasagna (my mom’s recipe)

-Penne with Italian Sausage Ragu (my recipe)

-Ina’s Pork Tenderloin with Ratatouille's Ratatouille – Really delicious


I’m in need of some new recipes so what have you made lately that’s been a hit?

Tuesday, February 19, 2013

the BEST chocolate chip cookies

I’ve made a lot of cookies in my lifetime even though I tend to not enjoy baking. And ever since I married someone without a sweet tooth for baked goods, I’ve done far less than ever before. But there comes a time when you just need a chocolate chip cookie. At least that happens to me.

DSC_0025

This past weekend I made my now go-to recipe for chocolate chip cookies and they were met with accolades. I take none of the praise since my recipe for cookies comes right off the back of a certain yellow package. But that being said, I’ve made a few minor changes that I think really helps these to shine.


3 things I’ve changed:

I bake on a rimmed, uncoated jelly roll pan lined with a silpat

I only use Kosher salt. For cooking and baking.

I change the ratios of sugar in favor of brown to create a chewier cookie


Tollhouse Chocolate Chip Cookies

*Replace sugars with 1 Cup Brown Sugar and 1/2 C White Sugar

*Replace Salt with Kosher Salt. Same measurement.


Happy Baking!

Friday, February 15, 2013

Foodie Friday: Vegetable Pad Thai

I really like to cook.

Unless of course I’m extremely sleep deprived and only have a short amount of time. Then I just like to cook…and that’s only if take out is not an option.

That’s where this recipe comes in. Wednesday night we returned from the gym with a 30 minute window before both of us would be calling the delivery guy from Jimmy Johns. We were on the verge. And because I had just made this recipe for some dear friends who just had twins, I knew it was fast, easy and delicious.

So dinner was freaky fast and homemade too.

IMG_0667

Pad Thai is one of my favorites. I have a lot of them. But this is up there in the top 10. Alex, on the other hand, could take or leave it. Not sure what he’s thinking. Pretty sure the fish sauce scares him off. He hates seafood.

But every once and awhile I make him succumb to eating something I really like. And Wednesday night was one of those nights. This recipe is so delicious and once you have made it once or twice you will realize it’s actually really easy too. It seems like a lot of work at first but again, once you’ve done it a couple of times, it’s old hat.

Veggie Pad Thai

(adapted from Cooks Illustrated – for no adaptations see here)
Serves 4 as a main dish


1/3 C water and 1/3 C lime juice combined
3 tablespoons fish sauce
1 tablespoon rice vinegar
3 tablespoons brown sugar
¾ teaspoon cayenne pepper (this packs some heat, lessen if you don’t like spice)
4 tablespoons peanut oil or vegetable oil
8 ounces dried rice stick noodles, about 1/8 inch wide (the width of linguine)
2 large eggs
¼ teaspoon table salt
3 cloves garlic, pressed through garlic press or minced (1 tablespoon)
1 medium shallot, minced (about 3 tablespoons)
6 tablespoons chopped unsalted roasted peanuts
3 cups bean sprouts (6 ounces)
5 medium scallions, green parts only, sliced thin on sharp bias
¼ cup fresh cilantro leaves (optional)
Veggies: Your choice…we used baby bok choy, carrot shreds, snow peas, yellow peppers


1. Stir fish sauce, rice vinegar, sugar, cayenne, and 2 tablespoons oil into the water/lime juice mixture and set aside.

2. Cover rice sticks with hot tap water in large bowl; soak until softened, pliable, and limp but not fully tender, about 20 minutes. Drain noodles and set aside. Beat eggs and 1/8 teaspoon salt in small bowl; set aside.

3. Heat 1 tablespoon oil in 12-inch skillet (preferably nonstick) over high heat until just beginning to smoke, about 2 minutes. Add vegetables and some water. Cover with lid so they steam. After approximately 10 minutes check for doneness. Should be tender but still crisp. Set aside.

4. Off heat, add remaining tablespoon oil to skillet and swirl to coat; add garlic and shallot, set skillet over medium heat and cook, stirring constantly, until light golden brown, about 1 1/2 minutes; add eggs to skillet and stir vigorously with wooden spoon until scrambled and barely moist, about 20 seconds. Add noodles and veggies to eggs; toss with 2 wooden spoons to combine. Pour fish sauce mixture over noodles, increase heat to high, and cook, tossing constantly, until noodles are evenly coated. Scatter 1/4 cup peanuts, bean sprouts, all but 1/4 cup scallions over noodles; continue to cook, tossing constantly, until noodles are tender, about 2 1/2 minutes (if not yet tender add 2 tablespoons water to skillet and continue to cook until tender)

5. Transfer noodles to serving platter, sprinkle with remaining scallions, 2 tablespoons peanuts, and cilantro; serve immediately, passing lime wedges separately.

NOTE: I’ve also made this with chicken. To cook the chicken I simply bake it in a pan with olive oil, salt, and pepper at 350 degrees for 20 minutes or until cooked through.


Saturday, February 9, 2013

Ridiculously Easy

This is my kind of food.

Simple. Delicious. Colorful. Filling.

I love to play a game with people I meet. The “what do you love” type of a game. For instance, I may randomly just ask you a question like “if you could only eat one type of food, cuisine, etc. what would it be.” I've asked these to family, friends, used them as ice breakers, kids, you name it I’ve probably asked it. I think you learn a lot about a person by what they like to eat.

If I were answering it, my answer would be a tie between Italian and Mexican. I know this based on what I fall back on when left to my own vices. Alex has been out of town for the past few days and so far I’ve eaten delicious pasta and mexican rice/black bean/salsa in a bowl.

I CAN’T – GET – ENOUGH!

I’ve added some fruit and vegetables to round things out in case anyone was worried. This pasta dish I threw together in five minutes flat. Almost easier than making a sandwich. So simple and beyond delicious. It’s literally a five ingredient meal, many of which are probably in most pantries, and if not, well they should be.

Fresh basil. Pasta (angel hair for me). Garlic. Grape tomatoes. Olive oil.

pasta

And this is how you do it…

1. Place tomatoes on a rimmed baking sheet. Top with some thinly sliced garlic. Drizzle with olive oil, salt and pepper.

DSC_0010

2. Bake at 350 degrees while you boil water for the pasta and cook it.

3. When the tomatoes are bursting at the seams and garlic is browning, take out and pour over your drained pasta. (about 20 min.) Top with fresh basil.

DSC_0011

Seriously. Wasn’t that ridiculously easy. And believe me, it’s amazing.

Off to eat some more:)

Thursday, June 21, 2012

The Best Chicken Enchiladas

For over 5 years I’ve been trying to make really good homemade enchiladas. I’ve failed every time until this last week. Well, I didn’t really fail…they were just never that great. You know? These ones though, are delicious. They take a little bit of love to make but sometimes the best things take a little time. 

It was a necessity to learn to make them because we have a favorite Mexican joint in the Cities that just moved closer to our house. It’s dangerous…because their enchiladas are really good. And probably not as great for our waist lines. But that’s okay, because this past week I made some that I think trump anything from El Loro. Best part, you can make half now and freeze the others for leftovers…that’s what I did! Leave it to me to wait 5 years to finally follow a recipe EXACTLY…these are delicious and we don’t even necessarily like red sauce enchiladas with corn tortillas. But we’re converts now.

DSC_1365 (6)


Chicken Enchiladas with Red Chili Sauce
recipe adapted from Cooks Illustrated Best Make Ahead Cookbook (worth owning if you ask me!)


Sauce and Filling:
2 tablespoons vegetable oil
1 medium onion, chopped fine (about 1 cup)
3 medium cloves garlic , minced
3 tablespoons chili powder 
2 tablespoons ground cumin
1/2 teaspoon table salt
2 teaspoons granulated sugar
1 pound boneless, skinless chicken thighs, trimmed of excess fat & cut into 1/4-inch-wide strips (I used leftover breast meat)
2 cans tomato sauce (8 ounces each)


1/3 Cup water
1/2 cup chopped fresh cilantro leaves
1 can (4 ounces) pickled jalapeños , drained and chopped (about 1/4 cup) 
10 ounces sharp cheddar cheese , grated (2 1/2 cups)
10 corn tortillas (six-inch)

FOR THE SAUCE AND FILLING:

Adjust oven rack to middle position and preheat to 300 degrees. Heat oil in medium saucepan over medium-high heat until hot and shimmering but not smoking, about 2 minutes; add onion and cook, stirring occasionally, until softened and beginning to brown, about 5 minutes. Add garlic, chili powder, cumin, salt, and sugar; cook, stirring constantly, until fragrant, about 30 seconds. Add chicken and cook, stirring constantly, until coated with spices, about 30 seconds. (I just added my precooked & shredded chicken breast meat  here. I probably had around 1 1/2- 2 Cups worth)

Add tomato sauce and water. Bring to simmer, then reduce heat to medium-low; simmer uncovered, stirring occasionally, until chicken is cooked through and flavors have melded, about 8 minutes.

Pour mixture through medium-mesh strainer into medium bowl, pressing on chicken and onions to extract as much sauce as possible; set sauce aside.

Transfer chicken mixture to large plate; let cool until you can handle it, shred, then combine with cilantro, jalapenos, and cheese in medium bowl and set aside. (Again, I didn’t need to shred but did need to let cool.)

TO ASSEMBLE:
Spray both sides of the tortillas with vegetable oil spray. Place 5 onto a baking sheet. Bake until soft and pliable, 2-4 minutes. Repeat with other 5. Place one tortilla on a flat surface and add a 1/4-1/3 Cup of filling down the middle. Fold the sides of the tortilla over the filling to overlap and place the filled tortilla seam side down onto a 9x13 baking dish. Repeat and continue with the remaining tortillas until filling is used up. (If you want to make half now and freeze the other half, fill 2 8x8 pans. Each 8x8 pan will feed 2)

Pour the strained sauce over the enchiladas and then sprinkle the cheese down the middle of the enchiladas. (If making two 8x8’s then place half of sauce and cheese in separate freezable containers)

To Cook Right Away: Change the oven temperature to 350 degrees, add sauce and cheese, cover the dish with foil and bake until sauce and cheese are bubbling, approximately 20-25 minutes.

Uncover and serve immediately!

If cooking the frozen pan: Unwrap the dish, spray the tops with vegetable foil spray and bake uncovered in a 400 degree oven until warmed through and lightly toasted on top, 10-15 min. Pour the THAWED sauce over the enchiladas, sprinkle with thawed cheese, cover with aluminum foil and back until sauce and cheese are bubbling, approximately 15-10 min.

Monday, June 11, 2012

Fresh Strawberry Muffins

This past weekend Alex and I headed out to the fields to pick strawberries. It was a gorgeous morning, full of sunshine, and the crops were bountiful thanks to an early spring and summer. We had our pick of rows and thankfully the row we picked was full of fat, ripe berries.
DSC_1377With our box full, visions of strawberry goodies were already running through my mind as the car wandered through the country on our way home. I knew strawberry jam was a given…the recipe straight off the box. But what to do with the other berries. I checked all my starred recipes in google reader and came across this one for muffins.

I quickly threw them together this morning before I headed out to the chiropractor and they did not disappoint. Moist, filling, and bursting with strawberry goodness, these were a winner. I did cut the recipe in half and came out with 11 muffins so had I made the full recipe I’m sure my yield would have been more like 22 as opposed to 18. Either way, they are a great way to use up some berries you picked from the ground or up from the store.
DSC_1365 (5)
Fresh Strawberry Muffins
yield: 11-12
adapted from Confections of a Foodie Bride

Ingredients:
1 1/2 C of Flour, + 1/2 T

1/2 T baking powder

1/4 t baking soda

1/4 t salt

5 Tbsp unsalted butter, softened

1/4 cup + 2T sugar

1 large eggs

1 1/4 t vanilla

3/4 cup plain fat-free Greek yogurt (I used 1/2 C yogurt and 1/4 C Sour Cream b/c I didn’t have enough

Generous 3/4 cup chopped strawberries
Coarse sugar, for sprinkling tops (optional)

Instructions:

-Preheat oven to 400

-Mix 1 1/2 cups flour, baking powder, baking soda, salt in medium bowl; set aside.

Cream butter and sugar on medium-high speed until light and fluffy, about 3 minutes.


-Add eggs, one at a time, beating well after each addition followed by the vanilla and almond extract.

-

Beat in half of dry ingredients, followed by a third of the yogurt.

Add remaining dry ingredients in two batches, alternating with the yogurt, until incorporated.

-Toss strawberries with the remaining 1/2 Tbsp flour and add to the mixer, mixing for just a few more seconds to distribute evenly (the batter will be very thick).

-

Spray a muffin tin with non-stick spray or line with paper liners.

Divide the batter evenly among cup

-

Bake for 8 minutes and then decrease oven temperature to 375 and bake for ~12 more minutes until golden brown and a skewer inserted in the center comes out clean.

-

Let cool 5 minutes in the pan before removing and cooling completely.

Tuesday, June 5, 2012

Sour Cream Old Fashioned Donuts

Growing up we were spoiled with the best donut place ever. In fact, every so often when we are back visiting my hometown in Wisconsin we stop in for donuts. There was one as a kid that I just loved…chocolate and vanilla dough swirled with chocolate and vanilla swirl frosting. It was and still is amazing. They are slightly crunchy on the outside and so soft and delicious on the inside. I haven’t found anywhere yet that has donuts as good.

In an attempt to recreate the past, I’ve tried to make donuts a few times. Twice I made raised yeast donuts and this past weekend I made Sour Cream Old Fashioned.
DSC_1364 (5)
Alex and I both agreed…when making homemade donuts go for the the Old Fashioned. These were so delicious…and the recipe only makes 12. So for those of you that might feel guilty eating a donut, you’re not stuck with an abundance. Even better, they keep really well in an air-tight container for at least a couple of days.

Not only are these easy but they come together really quickly. I bookmarked this off Pinterest on Thursday night and knew then that they would be made over the weekend. I even used the wrong kind of flour and they still turned out delicious! For some reason my brain read cake as bread and I was really worried. But I kept on and neither one of us could tell the difference.

The recipe for these mouth watering donuts can be found at Completely Delicious!

If you so dare, make these in the near future. You will not be disappointed!

Thursday, March 1, 2012

An Old Favorite


Memories of breakfast with my mother are high on my list of things I remember fondly. See the thing about my mother is that she would make pancakes for breakfast any day of the week; I just needed to ask early enough before racing out to school. And I never saw her pull out a recipe.

She just knew it. By heart. I’m sure she can still whip up a batch of these delicious cakes with a moment’s notice and I hope she never succumbs to convenience because these have nothing on Betty. As I grew older, I found myself constantly losing the recipe only to call her up and listen as she recited the familiar ingredients across the line. I always thought this was her recipe, but after a few years she let me in on a secret. These may just be the recipe from Betty herself in her big red book. Hmmm, maybe Betty and mom know best!

DSC_1367 - Copy
Either way, while Alex was flying across the friendly skies, I treated myself to a delicious stack accompanied by sweet strawberries for the day of love. I mean if I couldn’t have my first love I might as well have a food love nearby:)

Basic Pancakes (according to mom)

1 1/2 C flour
2 T sugar
1 T baking powder
1 egg, beaten
1 1/3 C milk
2 T oil

Combine all dry ingredients in a bowl and mix together. Beat the egg in a separate bowl, add milk and oil, then combine with dry ingredients until just mixed.

Heat skillet/griddle, spray with cooking spray or use a little butter, pour scant 1/4 C of batter on griddle. Flip when bubbly...enjoy!


Friday, September 9, 2011

Black Bean & Lime Quinoa


As the days of summer slowly retreat and tongues long for the fruit of autumn, I couldn’t resist sharing this ode to summer side dish.  Talk amongst friends peaked a curious mind to unearth the grain often forgotten in our house.  Quinoa.  A complete protein, with nutty wholesome taste, that takes on the flavors it is combined with.  For us, lime did the trick.

DSC_1164
This simple side is so versatile and delicious; you can change up the ingredients to your taste.  Only thing, make sure you add a distinct flavoring for the quinoa to soak up.  Many like to make the quinoa in chicken broth, imparting that taste for a more savory side.  Whereas this dish is rich in lime.  We all know the greatness of lime and cilantro…chipotle rice anyone?  This is similar with just a few more ingredients.  Perfect for a  light lunch or dinner accompaniment.

I sought out fellow bloggers for a how-to on preparing quinoa…looking to these for inspiration:  Our Best Bites and Healthy Tipping Point.

As far as the recipe, the inspiration came from here:  Epicurious.  I followed the dressing exactly and changed up the ingredients more for my taste.  This batch included red pepper, jalapeno, fresh corn, red onion, tomato, black beans, cilantro, salt, pepper, and some garlic.

This is when cooking gets fun…use your imagination!